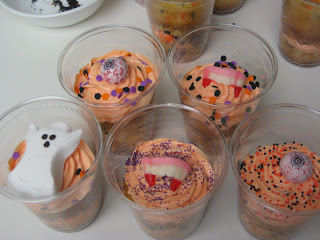
Ok, so here they are. Simple, fun and easy to make, KakeCups! I told you they were cute.
The steps are really simple. Make your favorite cake mix into cupcakes. I used Jumbo cupcakes for these because they fit perfectly into the 12 oz. cups.
Next you let the cupcakes cool completely on wire racks to avoid burnt fingertips. I know they smell so yummy and its hard to resist just grabbing one and shoveling it in your mouth like I like to do but be patient.
Once they are cool enough to handle peel away the papers and cut them in half. I like a 2/3 bottoms to 1/3 top ratio just for presentation sake but you can cut them any way you like. Once you have cut them in half let them cool some more. If you skip this step you will regret it because if you place the warm cupcakes in the cups, condensation forms on the bottom underneath the cupcake making it soggy. Soggy cupcakes are sad cupcakes.
You will end up with tops and bottoms, but don't worry about matching them. This is supposed to be easy remember. They all go to the same place so it really doesn't matter as long as you filled your muffin pans fairly consistently. I use a measuring cup for the large ones and a metal cookie scoop for the regular sized cupcake tins.
Now, place the bottoms of your split cupcakes into the plastic cups like so. Next you'll "fill" the middle of your KakeCup. I used store bought frosting in an aerosol can. You can use frosting in a container and pipe it or simply spoon it in. I like to pipe frosting so I tried this one for the first time. It wasn't quite enough for all 12 jumbo cupcakes so you will need to buy 2 cans or use other frosting.
It doesn't have to be perfect since this is the middle and the top half is going to go on. Next I placed crushed Oreo's in the middle on top of my "filling" for fun. The Oreo's do not stay crunchy but the Oreo filling complimented the frosting well and the layered effect looked great.
This is still easy right? I told you this was fun. Let your kids in the kitchen to help, they'll love it.
I then place the cupcake tops in the cup on top of all the "fillings" we put in. Use your imagination and go wild with the fun candies out for Halloween. I saw gummy eyeballs (way to real looking for me), brains and bugs. The creepier, the candy the more fun your kids will have with it.
We are in the home stretch. All that is left is to frost the tops like you did the middle and decorate with your favorite candy or topping. The possibilities are endless and I love the fact you can see all the way through the cup.
This is a side view. I wish I had used more frosting but next time. These are as new to me as they are to you. I just thought of them one day and went for it. This is only the second batch. The first was as a birthday request for cupcakes and those bad boys were made from scratch. I love homemade cake! So different from box but the box mix is much faster for busy families an way less clean up. But if the baking purist in you is screaming to get out then these are great with scratch cupcakes too. I actually prefer the homemade frosting as well since it yields so much more and when you color it the color is richer. But that is for another post.
The final product with lids on. Aren't they so cute? I used gummy fangs, gumball eyeballs (not nearly as scary as the gummy ones) and of course what is Halloween without ghost peeps. Below is snapshot of all the sprinkles and candies. Oh, I did forget to mention that I put sprinkles on top before I put the candy on. Just for looks!
Some final snapshots of the finished goods. I took them to work and everyone loved them. The first batch I made I brought to work as well. My little taste testers at GT. One of the girls here even ventured out and made them for her son's birthday with just verbal instructions after I brought her one the very same night. Thanks KP for the support! By the way, hope you had a great birthday Dylan. I told you these were easy.
I love the portability of KakeCups. No need for fancy cupcake carriers, just grab a box or gift bag and take them with you. You can take them in your lunch or pack them in a kids lunch sack. How excited would they be to have some cupcake at school. Give your honey a little surprise and place on in the car cup holder with a note to have a good day at work. The possibilities are endless. The lid helps keep them fresh and now no more mess with eating them since you do it with a spoon and no messy paper or crumbs to deal with.
I had a great time making these and I hope you try them. Follow me for the next post. Until then. Happy Kaking!
Ammie


Your gonna make these and bring them into work right? OMG your making me hungry..
ReplyDelete